Reflection Activities
![]()
Mirror Magic
|
|
Use Plasticine to fix a comb, with its teeth pointing upwards, just in front of a board or box-lid. Aim the comb at the sun - but do not look at the sun. Let white light shine through the teeth, to form parallel (side-by-side) rays, making white lines. Notice how light usually travels in straight lines. That is why light casts shadows, and why you cannot normally see around corners. |
Hold a plane mirror, with its edge touching the board, in the path of the rays. Observe how the mirror reflects them. Angles formed with the mirror before and after reflection are always equal. This helps to explain how you see yourself in a plane mirror.
|
|
Rays from points A and B travel to the mirror, where they are reflected back to your eyes. You do not sense that the rays are bouncing off the mirror. Your brain believes that they are coming from points A1 and B1 (that seem to be behind or "inside" the mirror). |
![]()
To Make Mirror-Writing
| Put carbon paper, carbon side up, on a magazine. Use an inkless ball pen to write a message on paper which you have put over the carbon. Read the writing by looking at its image in a mirror. |
|
![]()
Funny Faces
| Is your face symmetrical? Find a photograph of yourself which shows your whole face from the front. Hold a mirror down the middle of the photograph. Look at both sides of your face. Does your face look strange? |
|
![]()
Mirror Painting
|
|
|
What happens
When you open the paper, you will have a painting that is the same on both sides, just as if you were looking in a mirror.
![]()
Bouncing Back
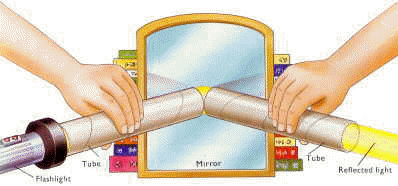
When light hits a smooth surface, it always bounces back at a matching angle. To see how this works, try this test.
You will need: a large mirror, two cardboard tubes, a flashlight, some books.

What happens
When the tubes are at the correct angle, the light will bounce off the mirror and down to the end of the second tube. If your friend holds her hand at the end of the tube, she will see a circle of reflected light. On a rough surface, light is not reflected like this. It is scattered back in several different directions.
![]()
Make a Kaleidoscope
The word "kaleidoscope" means "beautiful to look at." If you make a kaleidoscope, you will be able to see lots of beautiful symmetrical patterns.
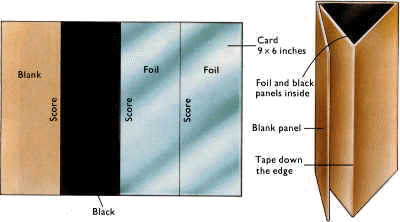
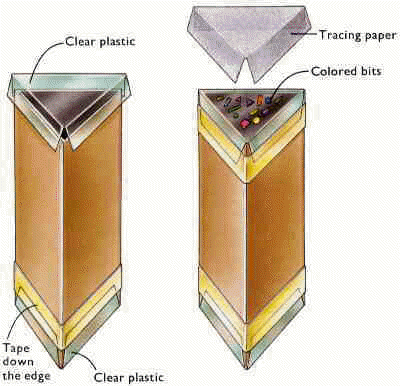
You will need: stiff cardboard, a pencil, scissors, black paper or a thick black felt pen, aluminum foil, glue, clear plastic, tracing paper, cellophane tape, small colored shapes or beads.
Card 9 x 6 inches
Foil and black panels inside
Blank panel
Tape down the edge


What happens
The light bounces back and forth between the foil mirrors. The reflections of the colored shapes or beads make interesting patterns. To change the pattern, shake your kaleidoscope so the shapes or beads move into new positions.
Found these pictures on the web. If these pictures should not of been used, please e mail me and I will promptly remove them.